Canvas confetti effect (Part 1): Setup
Have you ever wondered how those awesome visual effects on websites or applications are made? I recently found myself thinking about it when I saw confetti being fired after I finished reading some notifications. I decided to give it a try myself but the process was more intricate than expected and I had to learn and try different solutions.
In this three-part series, I want to share my learnings by creating a confetti effect from scratch. We’ll start with the basics: setting up a Canvas and creating the initial animation. Then, we’ll go deeper into making the particles more alive and finally optimizing the performance.
So, let’s start by laying the basic Canvas setup:
const canvas = document.querySelector("canvas");
const context = canvas.getContext("2d");

// set canvas size
canvas.height = window.innerHeight;
canvas.width = window.innerWidth;

// add resize handler
window.addEventListener("resize", () => {
  canvas.height = window.innerHeight;
  canvas.width = window.innerWidth;
});
This is a very common setup, we start by selected the canvas HTML element in the document and obtaining it’s 2D rendering context. We need the context because that’s what we use to draw on the canvas.
For testing purposes, we’ll set both the width and the height of the canvas to match the browser’s dimensions and fill the entire page. Additionally, we add an event listener to the resize event to update the canvas dimensions whenever the window size changes. This makes the canvas responsive.
With the setup in place, lets start working on the actual Particles. For this we’ll create a class that will serve as the foundation, for now we’ll just add an X and Y properties which will indicate the position of that particle in our canvas. Later we’ll add class methods to draw and update them.
class Particle {
  constructor(options) {
    this.x = options.x;
    this.y = options.y;
  }
}
Since we want to fire confetti when the user clicks on the canvas, we’ll attach a listener to it and create instances of the Particle class we’ve just created. We are also going to need some constant values to decide how many particles we want to create on each event and a place to store them.
// Amount of particles created per click
const PARTICLE_COUNT = 100;
// Array of active Particle instances
const ACTIVE_PARTICLES = [];

const createNewParticles = (event) => {
  const { x, y } = event;

  for (let i = 0; i < PARTICLE_COUNT; i++) {
    const particle = new Particle({ x, y });
    ACTIVE_PARTICLES.push(particle);
  }
};

canvas.addEventListener("mousedown", createNewParticles);
As you can see, whenever we click on the canvas, new instances of the Particle class are created:
Of course, creating instances of our Particle class alone doesn’t do much. Let’s draw these particles in our canvas now ✏️
To achieve this, we’ll extend our class by adding a draw method. For now, we’ll keep it simple and make circles with the same radii.
First we need to call the context beginPath method, wich ensures that any previous drawing commands or paths are cleared.
Now we draw the circles using the canvas arc method, which expect the following parameters: arc(x, y, radius, startAngle, endAngle, counterclockwise). We’ll start by passing the particle’s X and Y positions, followed by radius of 2, an startAngle of 0 and the endAngle of 360 to draw the full circumference.
Finally we use the fill method to apply the current fillStyle, since we have none, it’ll just default to a black background.
class Particle {
  ...

  draw() {
    context.beginPath();
    context.arc(this.x, this.y, 2, 0, Math.PI * 2, false);
    context.fill();
  }
}
Now we just need to call the draw method somewhere. For now let’s add it to the end of our createNewParticles function.
const createNewParticles = (event) => {
  const { x, y } = event;

  for (let i = 0; i < PARTICLE_COUNT; i++) {
    const particle = new Particle({ x, y });
    particle.draw(); // Draw the particles
    ACTIVE_PARTICLES.push(particle);
  }
};
Now we can see our particles being drawn in the canvas whenever we press on it:
But this doesn’t look like confetti at all 😒 these particles are static! we need to add some movement now.
But before we do that, we need to introduce a fundamental concept for creating smooth animations, the animation loop. Essentially, this loop consists of clearing the canvas, updating and rendering our particles and finally repeating the process again.
To repeat this process we’ll use requestAnimationFrame which tells the browser that we want to perform an animation and then invoke a callback function. There are other ways to create this loop but generally requestAnimationFrame provides a smoother and more efficient way for animating.
Don’t forget to remove the particle.draw() line from the createNewParticles method now that the loop controls is in control of this.
const animationLoop = () => {
  // clear canvas
  context.clearRect(0, 0, innerWidth, innerHeight);

  // draw each particle
  for (let i = 0; i < ACTIVE_PARTICLES.length; i++) {
    ACTIVE_PARTICLES[i].draw();
  }

  // Schedule next animation frame by invoking requestAnimationFrame
  requestAnimationFrame(animationLoop);
};

// Start the loop
animationLoop();
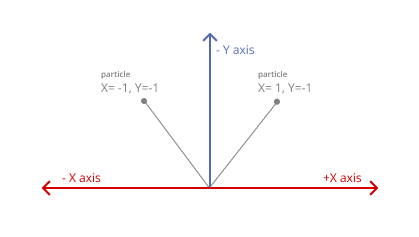
Now we have to make our particles move 💃, in order to do this, we’ll add a velocity property for both X and Y axes. This property will determine how many pixels a particle will move on each frame of the animation.
For now, we’ll set the X velocity to a random number between -1 and 1, while the Y velocity will be a random number from 0 to -1. This is because we’d like our particles to move in both directions within the X axis (left and right) but we only want them to move upwards on the Y axis.
We’ll also add an update method to our class, this method will, for now, update the position of the Particle by adding the velocity to the position and call the draw method at the end.
class Particle {
  constructor(options) {
    ...
    this.vx = Math.random() * 2 - 1;
    this.vy = Math.random() - 1;
  }

  update() {
	this.x += this.vx;
    this.y += this.vy;

	this.draw()
  }
}
Finally we’ll need to change our animate loop to call our new update method instead of the draw one.
// update each particle
for (let i = 0; i < ACTIVE_PARTICLES.length; i++) {
  ACTIVE_PARTICLES[i].update();
}
We can see our particles moving now! 🚀

But we have another problem 😩, they keep going on forever and that’s not what we want. It’s also not very good for performance reasons, if we click multiple times we can see our animation lagging.
In order to fix this let’s define a lifespan for our particles and make them disappear slowly over time. We’ll first need to add a constant to hold the max amount of frames a particle should live.
const PARTICLE_LIFESPAN_FRAMES = 200;
Then we’ll want to track how many frames the particle has been rendered, for this we’ll add a new property called lifespan to our class and increment it’s value on every update.
 constructor(options) {
    this.x = options.x;
    this.y = options.y;
    this.vx = Math.random() * 2 - 1;
    this.vy = Math.random() - 1;
    this.lifespan = 0;
  }

  draw() {
    const progress = this.lifespan / PARTICLE_LIFESPAN_FRAMES;

    context.beginPath();
    context.arc(this.x, this.y, 2, Math.PI * 2, false);
    context.globalAlpha = 1 - progress;
    context.closePath();
    context.fill();
  }

  update() {
    // Update position based on the velocity
    this.x += this.vx;
    this.y += this.vy;

    // Remove particles past it's lifespan
    if (this.lifespan > PARTICLE_LIFESPAN_FRAMES) {
      const index = ACTIVE_PARTICLES.indexOf(this);
      if (index !== -1) {
        ACTIVE_PARTICLES.splice(index, 1);
        return;
     }
    }

    // increment the lisfespan of this particle
    this.lifespan++;
    this.draw();
  }
We are also adding a conditional within the update method to check if the particle lifespan is above the limit we set and if it is, remove it from the active particle list.
Lastly, we also updated the draw method to calculate the progress of the particle based on the max lifespan. We can use that progress to decrease the opacity slowly over time.

Now the particles are deleted but they just keep going up and that’s not how confetti works.
We can quickly fix this by adding a gravity value that we’ll add to the Y velocity on every upadate. Additionally, we’ll also want to add some sort of air resistance, so as the particle moves upwards against gravity, the air resistance will slow it down, and as it moves downwards with gravity, the air resistance will have less of an effect, allowing it to speed up.
Let’s add these new constant and properties to our Particle class:
const GRAVITY = 0.06;
const AIR_RESISTANCE = 0.02;

class Particle {
...
  update() {
    // Apply gravity
    this.vy += GRAVITY;

    // Apply air resistance
    this.vx *= 1 - AIR_RESISTANCE;
    this.vy *= 1 - AIR_RESISTANCE;

    ...
  }
}
We are also going to increate the base velocity of our particles, previously we set them to 1 but that’s too slow for our purposes. This will set the X velocity to a random number between -5 and 5. And the Y velocity to a random number between -14 and -3.
Feel free to play around with these values and find what works best for the look you are after.
class Particle {
  constructor(options) {
    this.vx = Math.random() * 10 - 5;
    this.vy = -(Math.random() * 11 + 3);
    ...
  }

  ...
}

This is looking much better now, let’s wrap this first part by adding some color to our particles 🎨. Once again we’ll create a new constant to hold all the possible colors we’d like to have, in this case I’ll add three colors; red, blue and yellow.
const CONFETTI_COLOR_PRESETS = ["255, 99, 71", "70, 130, 180", "255, 215, 0"];
I’m settings those values as RGB just because it’s easier to change the opacity of each particle with RGBA.
Now let’s select a color randomly in our Particle class constructor
class Particle {
  constructor(options) {
  ...
  this.color = CONFETTI_COLOR_PRESETS[Math.floor(Math.random() * CONFETTI_COLOR_PRESETS.length)];
  }
}
Now that each instance has a color property defined by a random color from our preset, we need to update the draw method to use that color:
draw() {
    const progress = this.lifespan / PARTICLE_LIFESPAN_FRAMES;
    const alpha = 1 - progress;
    const fillStyle = `rgba(${this.color},${alpha})`;

    context.beginPath();
    context.arc(this.x, this.y, 2, Math.PI * 2, false);
    context.closePath();
    context.fillStyle = fillStyle;
    context.fill();
}
As you can see, we now set the fillStyle with the color and the alpha we previously set based on the progress.
Our particles are looking closer to confetti now 🎊🎊
In this part we have setup our canvas, added an animation loop, created a Particle class to update and draw each confetti with a gravity and air resistance.
In the next part of this series we’ll tune up the shape of each particle and the movement so it looks even more realistic.
You can get the code for this pare here